PsyLink is experimental hardware for reading muscle signals and using them to e.g. control the computer, recognize gestures, play video games, or simulate a keyboard. PsyLink is open source, sEMG-based, neural-network-powered, and can be obtained here.
This blog details the steps of building it and shows recent developments. Subscribe to new posts with any RSS reader, and join the community on the Matrix chatroom.
- All posts on one page
-
2025-05-01: PsyLink Talk
-
2024-08-16: Mass Production #2
-
2024-08-01: Android: First Step
-
2024-07-25: Rev2 Firmware
-
2024-07-24: Prototype Fund
-
2023-08-25: Data Sheets
-
2023-05-31: Prototype 10
-
2023-03-22: Enhanced Signal by >1000%
-
2023-03-06: Sample Signals
-
2023-02-05: 2022 Retrospective
-
2022-02-24: Added Bills of Materials
-
2022-02-23: 3M Red Dot electrodes
-
2022-02-22: Microchip 6N11-100
-
2022-02-16: Next Steps & Resources
-
2022-02-15: Mass production
-
2022-01-19: Prototype 9 + Matrix Chatroom
-
2022-01-18: HackChat & Hackaday Article
-
2021-12-19: Prototype 8 Demo Video
-
2021-12-18: Prototype 8
-
2021-12-16: INA155 Instrumentation …
-
2021-12-15: Power Module 4
-
2021-11-30: Batch Update
-
2021-07-17: Neurofeedback: Training in …
-
2021-07-06: New Frontpage + Logo
-
2021-06-24: Cyber Wristband of Telepathy …
-
2021-06-21: Running on AAA battery
-
2021-06-16: Power Module 3
-
2021-06-10: Believe The Datasheet
-
2021-06-04: Back to the Roots
-
2021-05-31: Website is Ready
-
2021-05-29: Dedicated Website
-
2021-05-17: Gyroscope + Accelerometer
-
2021-05-14: Wireless Prototype
-
2021-05-09: Power Supply Module
-
2021-05-07: New Name
-
2021-05-06: Finished new UI
-
2021-05-04: Higher Bandwidth, new UI
-
2021-04-30: PCB Time
-
2021-04-29: Soldering the Processing Units
-
2021-04-28: Going Wireless
-
2021-04-24: First Amplifier Circuit
-
2021-04-19: Amplifiers
-
2021-04-15: Multiplexers
-
2021-04-14: Data Cleaning
-
2021-04-13: Cyber Gauntlet +1
-
2021-04-11: Adding some AI
-
2021-04-09: F-Zero
-
2021-04-08: Baby Steps
-
2021-04-03: The Idea
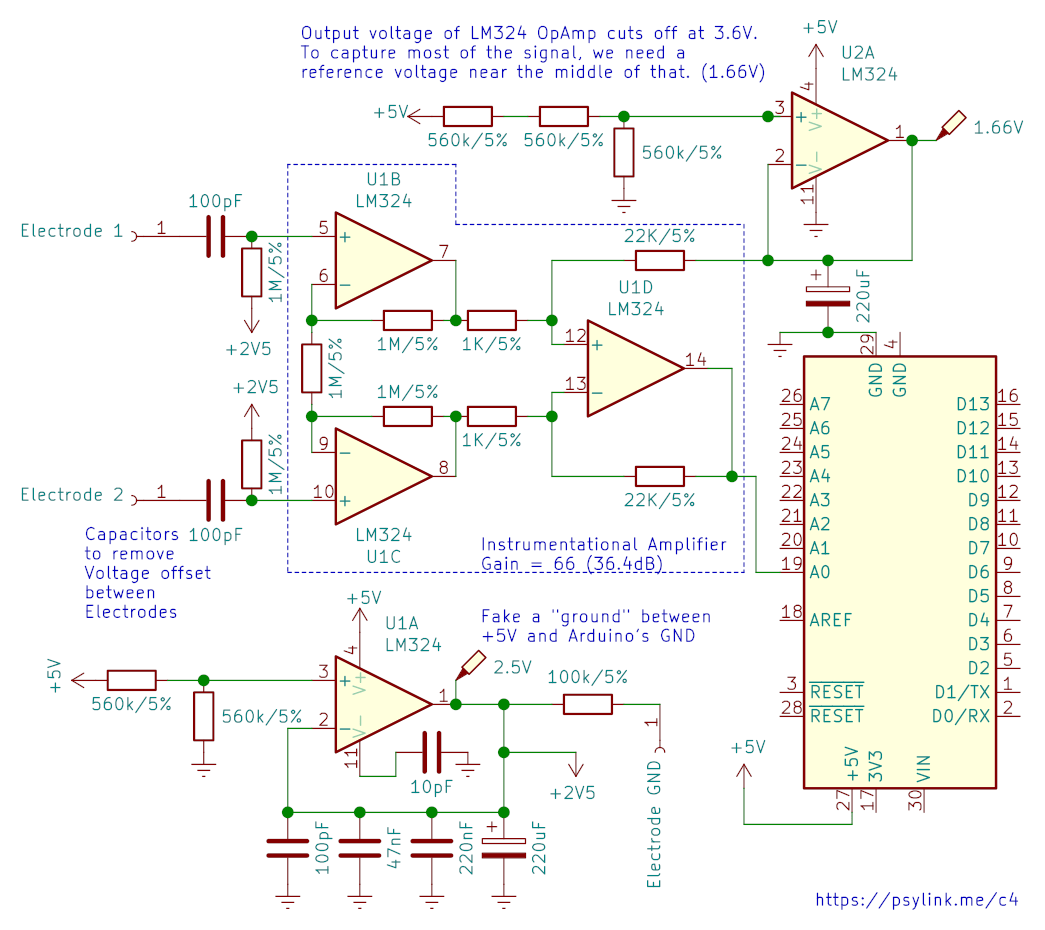
First Amplifier Circuit
└2021-04-24, by RomanI had my head stuck in electronics lectures, datasheets, and a breadboard to figure out a decent analog circuit for amplifying the signal. It sounds so straight forward, just plug the wires into the + and - pin of an operational amplifier, add a few resistors to specify the gain of the OpAmp, and feed the output to the analog input pin of the Arduino... But reality is messy, and it didn't quite work out like that.
Here's a list of problems:
- The voltage I measured from the electrodes seemed incredibly fragile. As soon
as I wanted to do something with it, it seemed to change. This could be due
to the high impedance of the skin, causing a drop in voltage as soon as one
draws any current.
- Solution: Used buffer amplifiers, in an instrumentation amplifier arrangement. Patrick Mercier from UCSD has a great lecture on that
- One electrode may have a DC voltage offset compared of the other electrode.
When this gets large (~50mV+), the amplified voltage difference gets off the
scale.
- Solution: Added capacitors that filter out the DC component. Through experimentation I found that 100pF worked best. Curiously, this is the same capacitance that's sometimes used to model the skin
- The OpAmp amplifies not just the signal but also the noise, like:
- Power line hum from USB connection
- Electromagnetic Interference
- Fluctuations in resistance/capacitance between electrode and muscle
- Solutions:
- Disconnect Laptop from main grid
- Keep wires short
- Add decoupling capacitors
- Perform occult protection magic ceremony
- In the future, perhaps some shielding or bandpass filtering
- I ordered a part that requires min. +/-2.25V. The Arduino supplies 3.3V, so
all is well, right? Nope. It means that I need negative 2.25V as well as
positive 2.25V.
- Solution: Increased the voltage of the entire circuit to 5V, which the Arduino conveniently supports by changing a solder jumper. The middle-ground reference voltage rose from 1.65V to 2.5V, leaving enough room for the required +/-2.25V. I don't actually use the part yet, but I wanted to prepare for it.
- The 2.5V reference voltage from the voltage divider
strongly fluctuated, messing up the output from the OpAmp.
- Solutions:
- Buffer amplifier after the voltage divider
- Bypass capacitors close to the OpAmps
- Solutions:
- The LM324N OpAmp that I used has an output voltage limit of 3.6V (at a supply
voltage of 5V.) That cuts off a good chunk of the signal.
- Solution: I added a second reference voltage at 1.66V so the output centers around that. (Conveniently, the output limit of 3.6V is close to the Arduino's ADC reference voltage of 3.3V.)
- Should I even do any of this? I'm limiting the neural network by introducing
my bias about what a clean signal looks like. Any circuit will invariably
filter out certain information, enhance other information, and add irrelevant
noise. How do I know that the information that I filter out (e.g. the DC
offset voltage between electrodes, or even what I consider irrelevant noise)
isn't useful to the neural network?
- Solution: Keep the signal processing reasonably minimal
I also connected the electrode signal to ground with a 1MΩ resistor which greatly improved the signal, and I have no idea why.
One peculiar thing I noticed was that the signal seemed stronger when my laptop was connected to the power supply. It superimposed noise, but also seemed to increase differences in electrode voltages. I don't quite understand this yet, but 2 things follow from that:
- For replication purposes, I'm using a Lenovo Thinkpad T460p switched to the Intel GPU, which creates it's own particular noise patterns, even when unplugged from the grid.
- I should try out modulating the ground electrode voltage with a controlled low frequency pattern to see if this improves signal to noise ratio. Ideally <30Hz or >500Hz so I can easily filer it out later.
Some of the references I used:
- Olimex "SHIELD-EKG-EMG"
- EEVblog OpAmps Tutorial
- EEVblog Bypass Capacitor Tutorial
- Patrick Mercier's lectures on Instrumentational Amplifiers
- BioPhysical Modeling, Characterization and Optimization of Electro-Quasistatic Human Body Communication, arXiv:1805.05200v1
The resulting circuit:
And the signals look like:

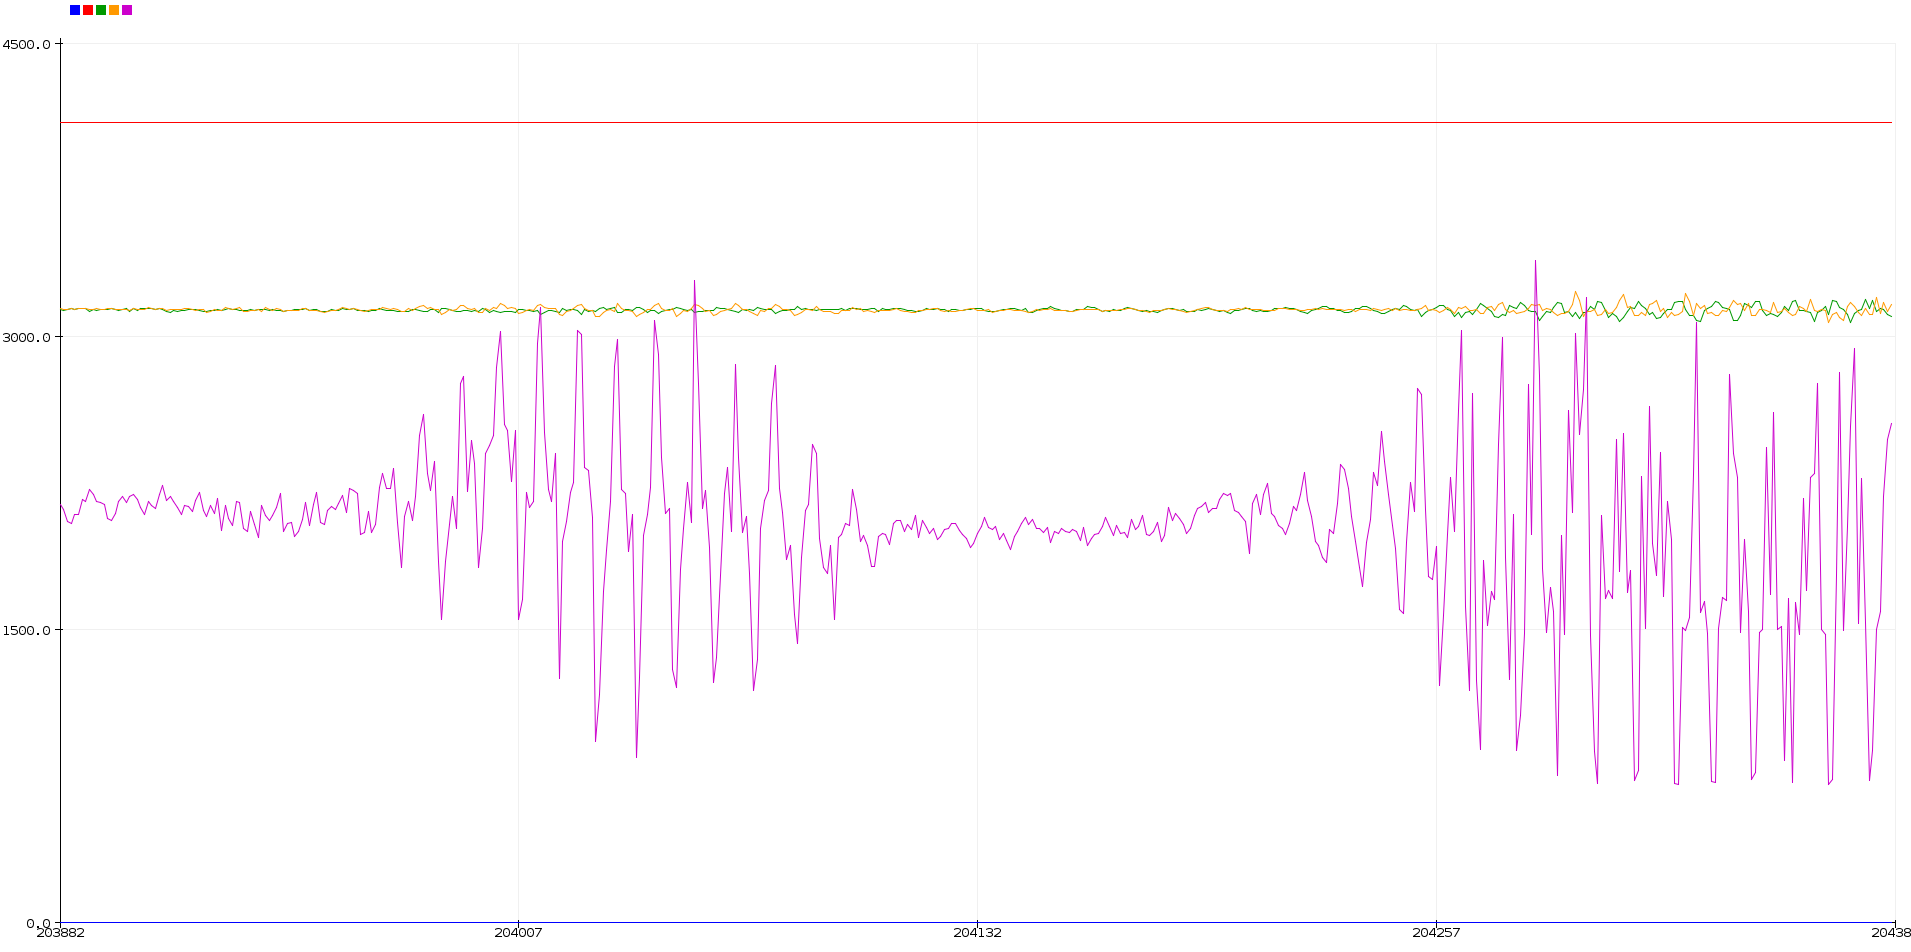
Yellow and green are two electrodes, right after their respective OpAmp, and purple is (yellow-green)*20.
This should be good enough to move forward, but I bought some INA128 instrumentation amplifiers and perhaps I will tinker some more to get an even better signal. Can't wait for the next prototype though :).
In other news, I watched Dr. Gregory House explain forearm muscles, so next time my electrode placement will be better than random!
And since I learned KiCad for creating the above schematic, I thought I'd add schematics for the previous models as well, see circuits.
Amplifiers
└2021-04-19, by RomanI have the feeling that before building the next prototype, I should figure out some way of enhancing the signal in hardware before passing it to the microcontroller. It's fun to hook the 'trodes straight to the ADC and still get results, but I don't think the results are optimal. So these days I'm mostly researching and tinkering with OpAmps.
Multiplexers
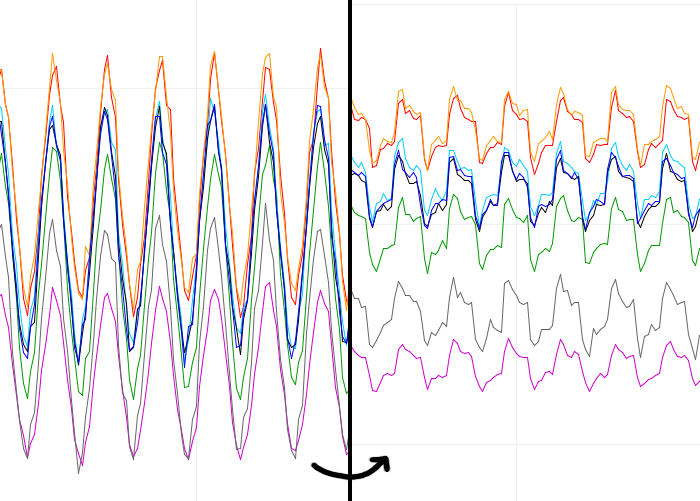
└2021-04-15, by RomanThe analog multipexers (5x DG409DJZ) and other stuff arrived! I almost bought a digital multiplexer, because I didn't know there were various types... But I think that these will work for my use case. The raw signal that I get out of it looks a little different, but when I filter out the low & high frequencies with TestMultiplexer2.ino, the direct signal and the one that goes through the multiplexer looks almost identical =D.
Data Cleaning
└2021-04-14, by RomanThe arduino code now produces samples at a consistent 1kHz. I also moved the serial read operations of the calibrator software into a separate thread so that it doesn't slow down on heavy load, causing the buffer to fill up, and the labeling to desynchronize. I am once again confused and surprised that I got ANY useful results before.
I disconnected analog input pin 7 from any electrode, and used it as a baseline for the other analog reads. By subtracting pin 7 from every other pin, the noise that all reads had in common was cancelled out. Hope this doesn't do more harm than good.
I also connected the ground line to one of the wrist electrodes rather than to the palm, since the palm electrode tended to move around a bit, rendering all the other signals unstable.
And did you know that the signals looks much cleaner when you unplug the laptop from the power grid? :p
I'll finish with a video of me trying to play the frustrating one-button jumping game Sienna by flipping my wrist. This doesn't go so well, but maybe this game isn't the best benchmark :D My short-term goal is to finish level 1 of this game with my device.
Cyber Gauntlet +1
└2021-04-13, by RomanSo if you ever worked with electromyography, this will come to no surprise to you, but OMG, my signal got so much better once I added a ground electrode and connected it to the ground pin of the Arduino. I tried using a ground electrode before, but connected it to AREF instead of GND, which had no effect, so I prioritized other branches of pareto improvement.
I am once again confused and surprised that I got ANY useful results before.
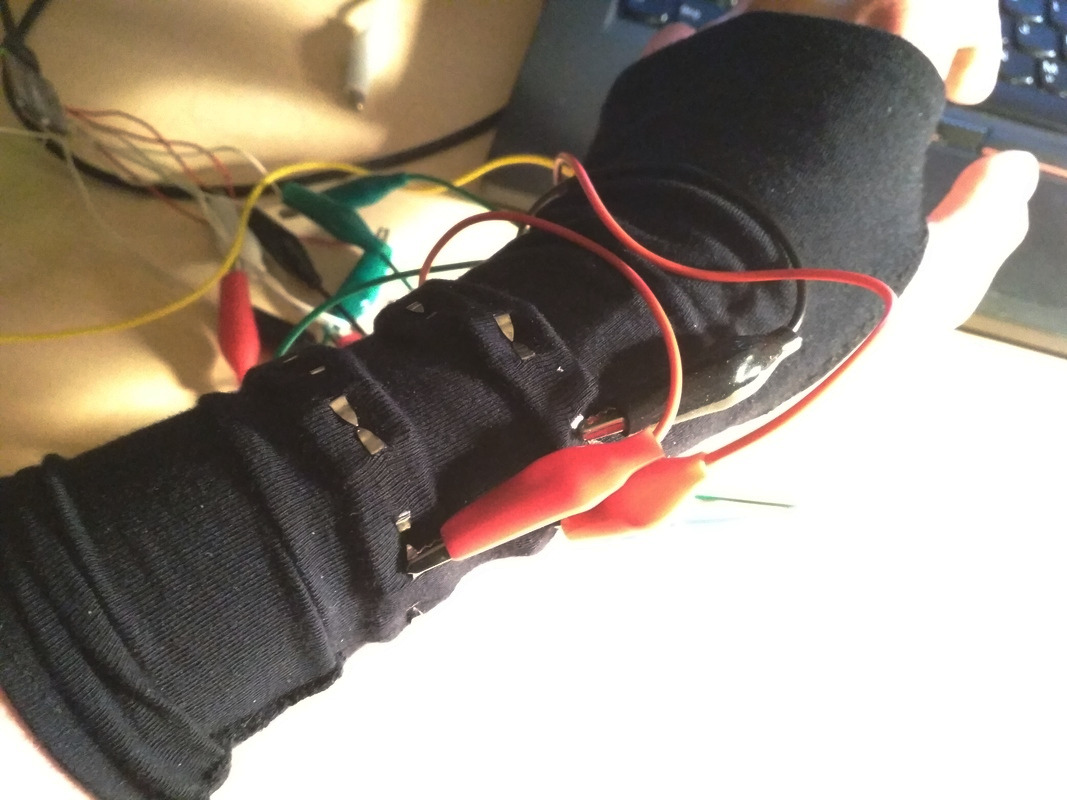
For prototype #3, I moved the electodes further down towards the wrist in hope that I'll be able to track individual finger movements. It had 17 electrodes, 2x8 going around the wrist, as well as a ground electrode at the lower palm. Only 9 of the 17 electrodes are connected, 8 directly to the ADC pins, and one to 1.65V, which I created through a voltage divider using two 560kΩ resistors between the 3.3V and GND pins of the Arduino, so that the electrode signals will nicely oscillate around the middle of the input voltage range.
It all started out like a piece of goth armwear:
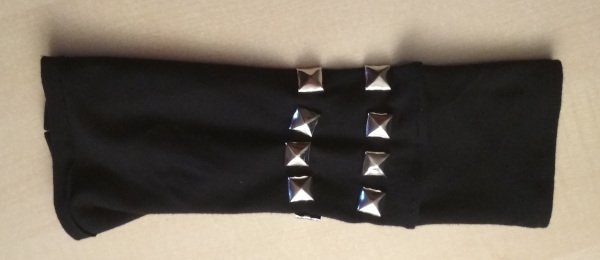
Photo from the testing period:
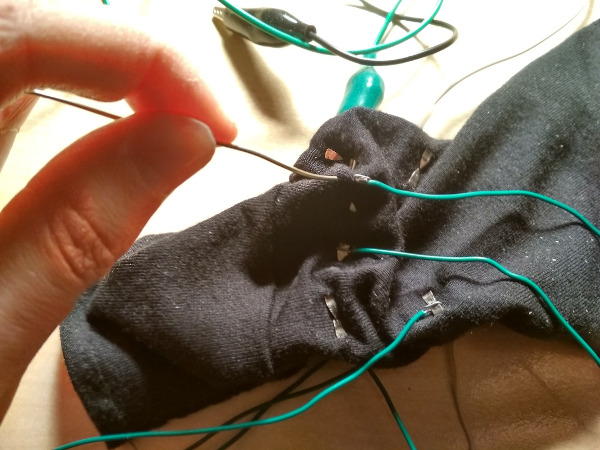
Soldering wires to the electrodes:
The "opened" state shows the components of the device:
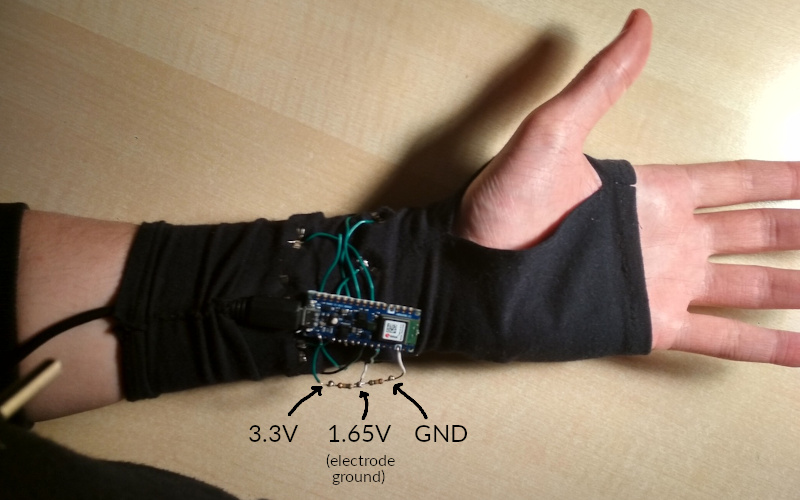
But it can be covered by wrapping around a layer of cloth, turning it into an inconspicuous fingerless glove:
If you look hard at this picture, you can see the LED of the Arduino glowing through the fabric, the voltage divider to the right of it, appearing like a line pressing through the fabric, the ground electrode on the lower right edge of my palm, and the food crumbs on my laptop :)
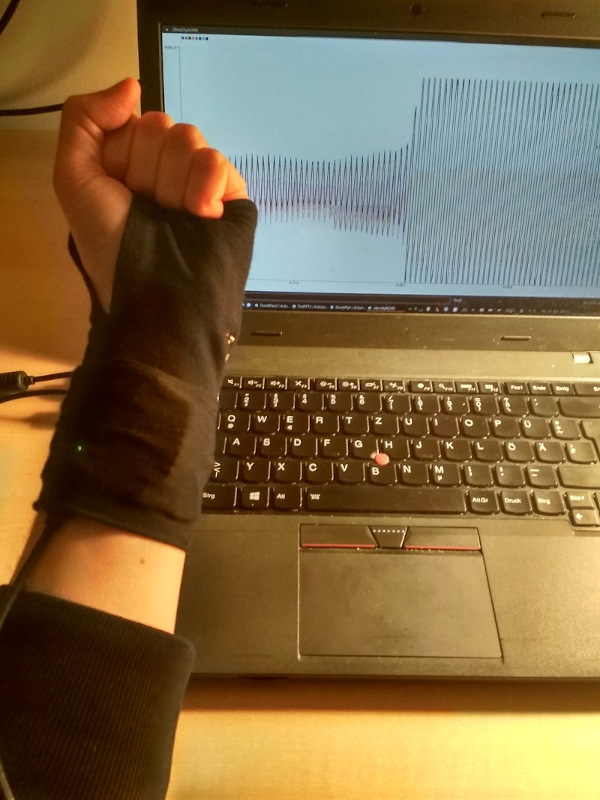
The signal seems to be much better, and as I move my arm and hand around, I can see distinct patterns using the Arduino IDE signal plotter, but for some reason the neural network doesn't seem to process it as well. Will need some tinkering. I hope it was not a mistake to leave out the electrodes at the upper forearm.
I already ordered parts for the next prototype. If all goes well, it's going to have 33 'trodes using analog multiplexers. The electrodes will be more professional & comfortable as well. Can't wait!